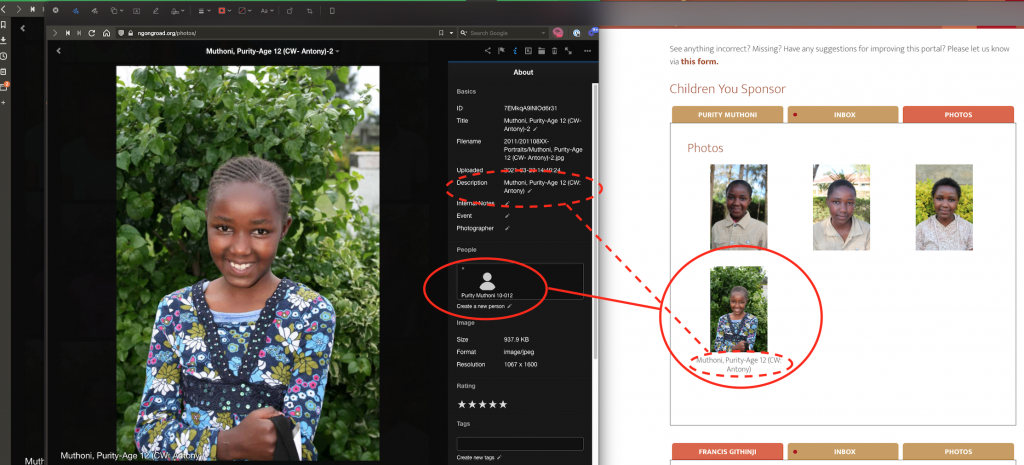
FoNR/NRCF now has a cloud-based photo library called WePix. It is an app that runs on top of the FoNR website accessible at ngongroad.org/photos
This app serves two main purposes:
1) Intelligently store photos and make photos easy to find and export for marketing and other purposes.
2) Allow photos to be tagged to students and automatically displayed in the portal for sponsors to see.
Documentation
WePix Dashboard Overview
- Smart Albums
- New Images: All newly imported, untagged images will appear here. As soon as any tag or edit is made to photo it will drop off this list.
- Possible Duplicates: This will show images that are identified as identical, uploaded more than once.
- Flagged for Review: This will show images tagged by students that need approval.
Tag People in Photos (for Admins)
Tagging is the paramount feature of this system. When students are tagged photos will automatically appear in portal for sponsors and students to view.

Tag People in Photos (for Students)
Students will access the “New Photos” to be tagged queue via a link on their student portal dashboard.
🎥 Coming Soon…
General Tagging of Photos
Just like we can tag blog posts in WordPress we can also tag photos according to categories or topics. This will automatically create albums based on tags allowing for quick access to photos by tag regardless of where they are stored.
🎥 Coming Soon…
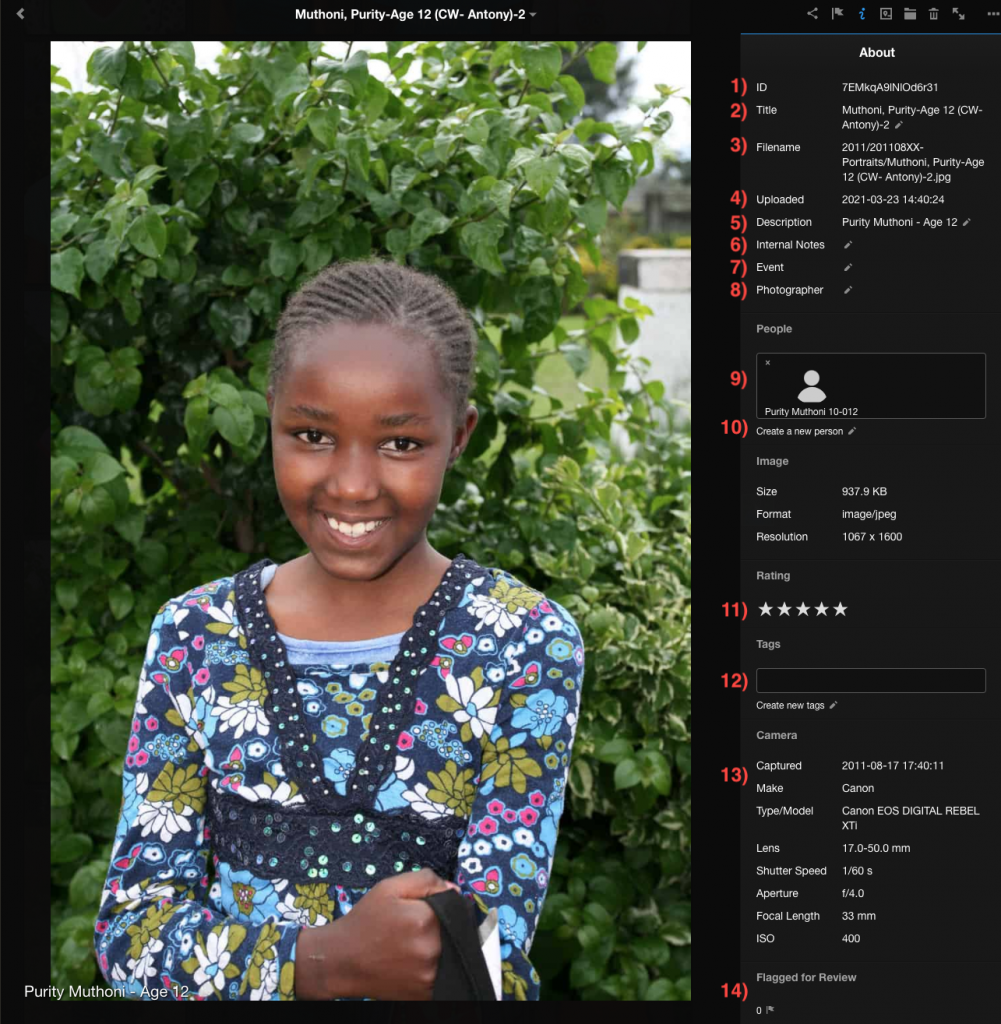
Photo Info Panel Deep Dive
Toggle Info Panel visibility using the “i” button in upper right.

- ID: Automatically generated unique ID for photo. Can be used for search but usually easier to just copy and share url (which contains this ID)
- Title: Name of photo, defaults to filename but can be changed. Searchable for internal use only.
- Filename: Original name of file when image was imported. Cannot be changed.
- Uploaded: Date photo was imported.
- Description: Think of this as the caption. It is used externally. It is displayed in the sponsor portal gallery.
- Internal Notes: Put anything you want here. Notes about how or when it was used, some noteworthy you want to search on, etc. As name suggests it is for internal use only.
- Event: This is special sort of tag that helps group photos according to the event during which they were taken.
- Photographer: Who took the photo?
- People: This is where you tag students and other people pictured in photo.
- Create a new person: Use this for adding people we care to track photos for whom are not students.
- Rank: 1 star is bad. 5 stars is homepage/cover photo quality. Ranking photos helps us find high quality images more quickly.
- Tags: Another more custom means of categorizing photos and making them easy to find for posterity. We can use tags for things like tracking photo requests, campaigns, as well us themes of photos like trips, slum life, schools, etc. The possibilities here are limitless and we’ll need to refine how we use this over time. Note: At this time tag “Groups” cannot be managed via /photos UI (must be done via brilliantstorage.app using these creds).
- Camera EXIF: This info comes from photo metadata and explains what type of camera was used and when.
- Flagged for Review: This is a quick means of flagging images for review by some else (or yourself at a later date). Also images automatically get flagged when students tag in order to enforce a review to happen.
Keyboard Shortcuts
You can use your keyboard to navigate and tag photos for greater efficiency. Here’s the shortcuts that are supported:
| Context | Key | Action |
|---|---|---|
| Any | / | Search |
| Photo | Left/Right Arrow | Navigate back/forward |
| Photo | t | Change the terms |
| Photo | o | Change the overlay |
| Album | u | Upload photos |
| Album | n | Create new (sub) album |
| Album/Photo | r | Rename/change the title |
| Album/Photo | d | Change the description |
| Album/Photo | i | Toggle the sidebar |
| Album/Photo | cmd/ctrl-delete | Delete the album/photo |
| Album/Photo | cmd/ctrl-a | Select all |
| Album/Photo | f | Toggle fullscreen |
Batch Edit Photos
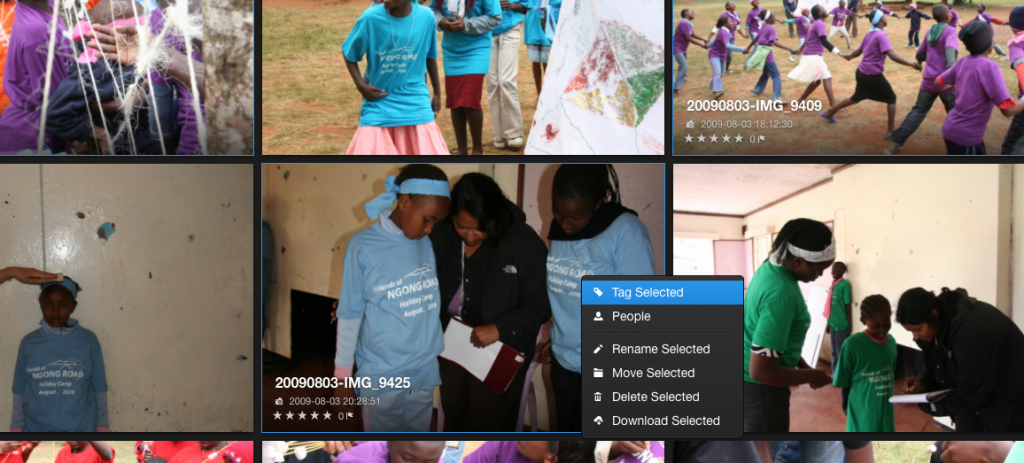
Batch selecting and editing is not obvious but is power. To batch select you hold down the command key (on mac) or control (on Windows) and click on photos to select (you’ll see a light blue border indicating selection). The right-click on one of the selected photos to see your batch operation options:

🎥 Coming Soon…
Searching for Photos/Finding Photos of People
There is a search in upper right of dashboard. The search works ok but isn’t perfect… search works by matching text you enter across image meta data, filenames, folder names, albums names, photographer names, etc. Hence when searching for say “Kelvin Thuku” you’ll get some photos that he’s taken and isn’t in which may not be what you’re looking for.
Each person we tag will have their own smart album. Right now the list of smart albums is very long because we have so many students and I automatically generated smart albums for every student. Smart albums are sorted the order they were created so Kelvin’s (and other staff/board members’) is toward the bottom after all the students. I have also requested features for sorting and collapse/expand on the collection of smart albums.
Now easiest way to jump to a smart album is to just do a “Find on Page” Command+F and start typing their name. Here’s Kelvin’s:
https://ngongroad.org/photos/#person-P3JGO79OMdVB1Dd6
Here’s a short video demonstrating both techniques:
Importing New Photos
The easiest way to upload new photos (or ask photographers to upload their photos) is to use this webform: ngongroad.org/upload
(Note: this form does not require a login to WePix so anyone we ask can use it to share photos)
Simply enter an Event Name, Photographer, and then drag/drop or browse to select the images you want to upload. This form will automatically create a new album, under the current year, with a name of the format YYYYMMDD <Event Name>. Uploading can take a while depending on the size and quantity of files selected. Once complete you will see links allowing you to upload more or go to the newly created album in WePix (where you can tag people, ⭐️ rank, and add custom tags).
It is worth noting that you can also add photos directing within WePix by clicking the “+” button in the upper right. This option, however, requires you to have already created a properly named album(s) within the correct year. It is probably most useful for adding an image or two to an existing album or re-adding an image after editing in Photoshop or something like that.
Exporting Photos
🎥 Coming Soon…